Developer Guide
- Setting up, getting started
- Design
- Implementation
- Documentation, logging, testing, configuration, dev-ops
- Appendix: Requirements
- Appendix: Instructions for manual testing
Setting up, getting started
Refer to the guide Setting up and getting started.
Design
Architecture

The Architecture Diagram given above explains the high-level design of the App. Given below is a quick overview of each component.
Main has two classes called Main and MainApp. It is responsible for,
- At app launch: Initializes the components in the correct sequence, and connects them up with each other.
- At shut down: Shuts down the components and invokes clean-up methods where necessary.
Commons represents a collection of classes used by multiple other components.
The rest of the App consists of four components.
-
UI: The UI of the App. -
Logic: The command executor. -
Model: Holds the data of the App in memory. -
Storage: Reads data from, and writes data to, the hard disk.
Each of the four components,
- defines its API in an
interfacewith the same name as the Component. - exposes its functionality using a concrete
{Component Name}Managerclass (which implements the corresponding APIinterfacementioned in the previous point.
For example, the Logic component (see the class diagram given below) defines its API in the Logic.java interface and exposes its functionality using the LogicManager.java class which implements the Logic interface.

How the architecture components interact with each other
The Sequence Diagram below shows how the components interact with each other for the scenario where the user issues the command delete 1.

The sections below give more details of each component.
UI component

API :
Ui.java
The UI consists of a MainWindow that is made up of parts e.g.CommandBox, ResultDisplay, BugListPanel, StatusBarFooter etc. All these, including the MainWindow, inherit from the abstract UiPart class.
The UI component uses JavaFx UI framework. The layout of these UI parts are defined in matching .fxml files that are in the src/main/resources/view folder. For example, the layout of the MainWindow is specified in MainWindow.fxml
The UI component,
- Executes user commands using the
Logiccomponent. - Listens for changes to
Modeldata so that the UI can be updated with the modified data.
Logic component

API :
Logic.java
-
Logicuses theKanBugTrackerParserclass to parse the user command. - This results in a
Commandobject which is executed by theLogicManager. - The command execution can affect the
Model(e.g. adding a bug). - The result of the command execution is encapsulated as a
CommandResultobject which is passed back to theUi. - In addition, the
CommandResultobject can also instruct theUito perform certain actions, such as displaying help to the user.
Given below is the Sequence Diagram for interactions within the Logic component for the execute("delete 1") API call.

DeleteCommandParser should end at the destroy marker (X) but due to a limitation of PlantUML, the lifeline reaches the end of diagram.
Model component

API : Model.java
The Model,
- stores a
UserPrefobject that represents the user’s preferences. - stores the KanBug Tracker data.
- exposes an unmodifiable
ObservableList<Bug>that can be ‘observed’ e.g. the UI can be bound to this list so that the UI automatically updates when the data in the list change. - does not depend on any of the other three components.
Tag list in the KanBugTracker, which Bug references. This allows KanBugTracker to only require one Tag object per unique Tag, instead of each Bug needing their own Tag object.
Storage component

API : Storage.java
The Storage component,
- can save
UserPrefobjects in json format and read it back. - can save the KanBug Tracker data in json format and read it back.
Common classes
Classes used by multiple components are in the seedu.address.commons package.
Implementation
This section describes some noteworthy details on how certain features are implemented.
Kanban view window feature
Implementation
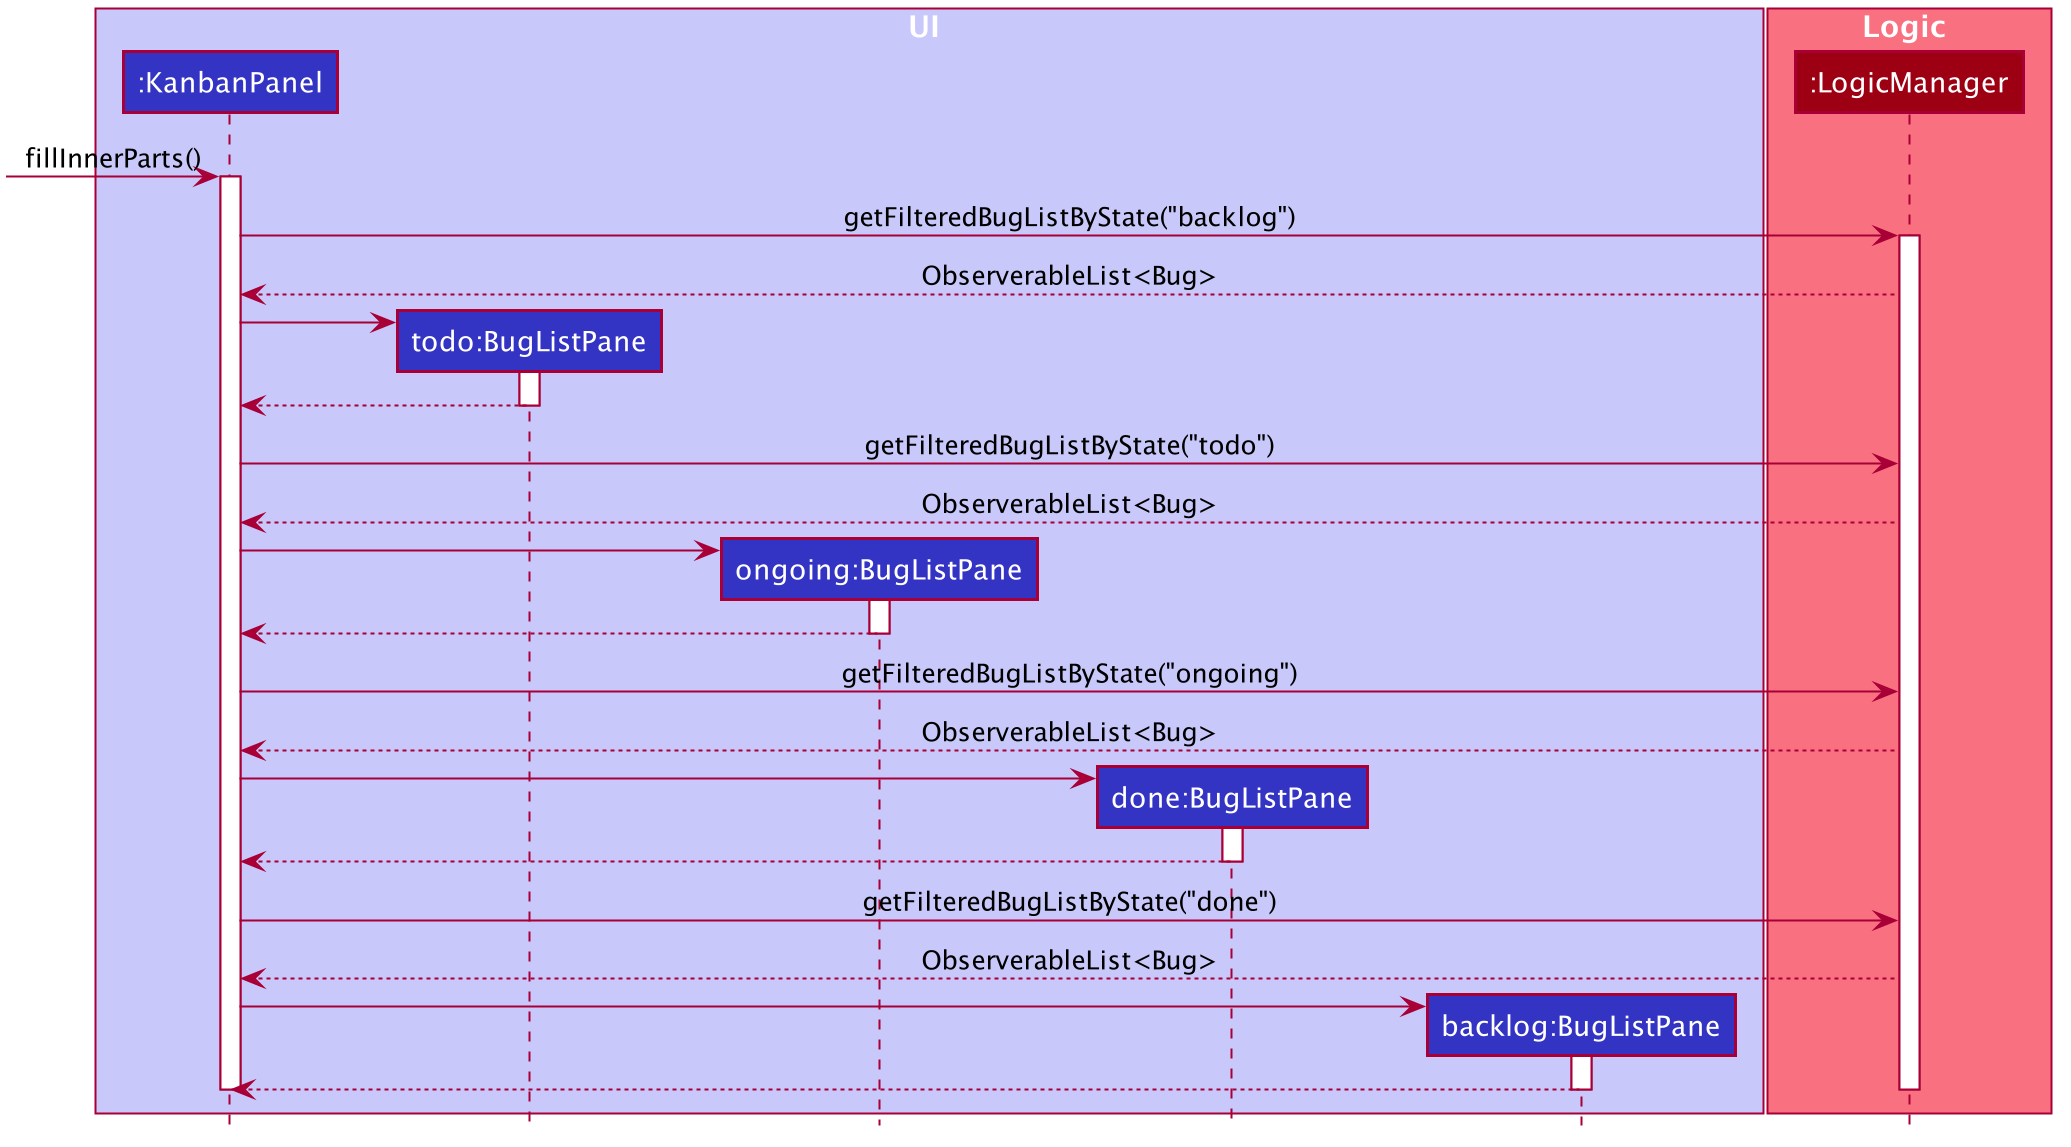
The Kanban view window would comprise of 4 columns that would divide the list of bug by their states. This would be implemented by putting 4 BugListPane in a horizontal box. The 4 BugListPane objects would be constructed using a ObservableList that contains only the bugs that belong to their respective state. This observable list would be provided by the LogicManager. These 4 BugListPane objects would be filled when the method fillInnerParts() is called by MainWindow.

Given below is how the KanbanPanel window will create the 4 BugListPane objects
Step 1: The user launches the app and the system initialises the User Interface.
Step 2:
MainWindow calls fillInnerParts() on KanbanPanel .
Step 3:
For each of the 4 states, KanbanPanel would call getFilteredBugListByState() on logic manager to get the appropriate lists and create the BugListPane.
Given below is sequence diagram for the creation of the BugListPane objects:
With the implementation of Kanban view window, commands such as delete, move and edit that depend on the index would not work as expected. This is because Kanban view separates the bugs and places them in different columns. As such, it would be essential to allow the users to execute these commands in Kanban view as we implement the new window. This can be done by allowing the user to choose which column would be affected by these commands.
This can be done by adding the following classes:
-
DeleteByStateCommandwhich extendsDeleteCommand -
MoveBystateCommandwhich extendsMoveCommand -
EditByStateCommandwhich extendsEditCommand
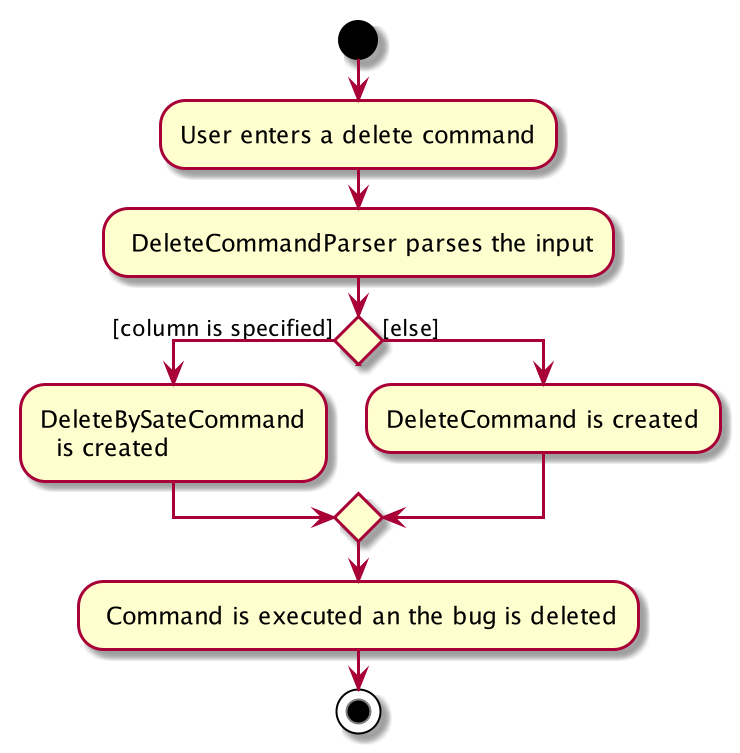
These command would take in an extra input to specify which column is being targeted. The list of bugs would then be filtered according to the column specified. The respective parsers would also have to be modified such that a new command could be returned if a column is specified. The following activity diagram summarises what happens when the user enters a delete command.(edit and move command parser would act in a similar way)
Design considerations
-
Alternative 1: Use a prefix “c/” to specify which column we are referring to.(Current choice)
- Pros: Easier to implement.
- Cons: Adds an additional prefix which the user has to remember.
-
Alternative 2: Allow the users to specify an active column and execute the commands with respect to that column
- Cons: Need to add an additional command to change the active column.
Edit Tag feature
This feature allows a user to edit an existing tag of a particular bug. Users will only need to specify the specific tag that they want to edit, which saves them the hassle of having to delete all the tags of the bug and add them again.
The user can make use of this feature by entering the editTag command, which follows the following format: editTag INDEX (c/COLUMN) ot/OLD_TAG nt/NEW_TAG.
To understand in greater depth the format of the command, you may refer to our User Guide
This section explains:
- How the
editTagcommand works and the methods that it invokes during execution (Implementation subsection). - The various considerations that were weighed when brainstorming the design of the edit tag feature (Design Considerations subsection).
- A summary that shows a simplified Activity Diagram that captures the essential logic in the execution of the
editTagcommand (Summary subsection).
Implementation
The edit tag feature is mainly facilitated by the EditTagCommand and EditTagByStateCommand objects.
In understanding how the editTag command works, it is crucial to understand the execute() method from both the EditTagCommand class and EditTagByStateCommand class.
The EditTagCommand and EditTagByStateCommand classes are largely similar. The only difference is that EditTagByStateCommand requires the state of a bug to be supplied when creating an instance of EditTagByStateCommand. Which object is created depends on the view of the application that the user is in. To understand this in greater depth, you are encouraged to read the following section.
The execution of the execute() method of EditTagCommand and EditTagByStateCommand is largely similar. As such, I will only go through in detail the execution of execute() of the EditTagCommand for brevity.
Refer to the sequence diagram below to understand the top-level execution of the execute() method after the user enters a valid editTag command.
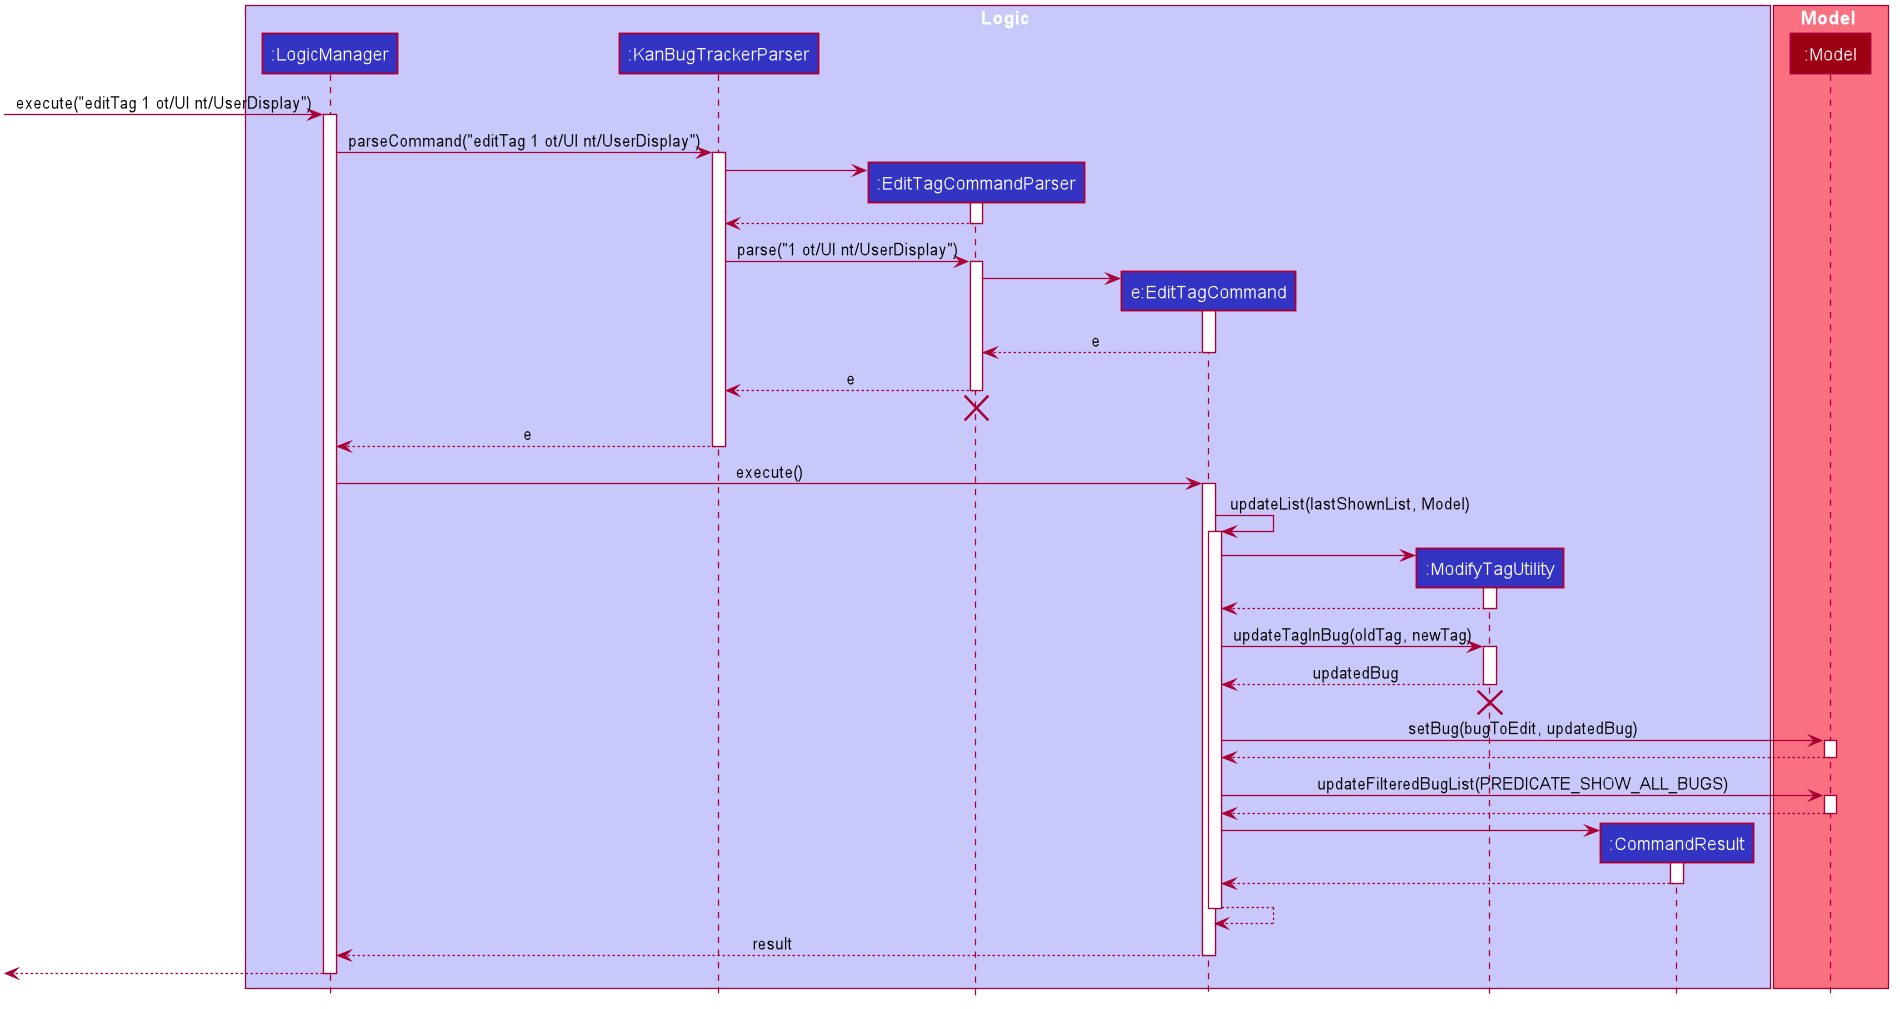
EditTagCommandParser object and ModifyTagUtility object should end at the destroy marker (X) but due to a limitation of PlantUML, the lifeline reaches the end of diagram.
From the above diagram, editing the UI tag of the bug at index 1 in List View to UserDisplay involves the following steps:
Step 1: User inputs editTag 1 ot/UI nt/UserDisplay to achieve the outcome as described above.
Step 2: This input is saved as a String and passed into LogicManager.
Step 3: The String is passed to KanBugTrackerParser, which sends the index of the bug, the old tag value and the new tag value to EditTagCommandParser.
Step 4: The EditTagCommandParser checks that the old tag and new tag are valid tags, creates an EditTagCommand object with the bug to edit, old tag and new tag and returns it to LogicManager.
Step 5: LogicManager then calls the execute() method of EditTagCommand.
Step 6: The EditTagCommand object then uses the relevant information (bug to edit) to create an instance of a ModifyTagUtility object.
Step 7: The EditTagCommand object calls the updateTagInBug(oldTag, newTag) method of ModiftTagUtility to create an updated version of the target bug with the correct new tag.
Step 8: If the bug is updated successfully, the new state of the target bug is updated in the Model. A CommandResult object is created and returned to LogicManager. The GUI is updated and a success message is displayed to the user. Otherwise, if the bug is not updated. A CommandResult object is still created and returned to LogicManager. The GUI displays an error message to the user.
Design Considerations
- Alternative 1 (Current choice): Create a new
EditTagCommandto handle this functionality- Pros: This implementation allows for better design as it limits the scope of the
EditTagCommandand allows it to solely focus on implementing the functionality needed. - Cons: Requires many more supporting classes to be implemented along side the
EditTagCommandto support the functionality.
- Pros: This implementation allows for better design as it limits the scope of the
- Alternative 2 : Expand the existing
EditCommandto handle this functionality- Pros: Easy to implement as it requires just adding new prefixes to the existing
EditCommandParser. - Cons: This will turn the edit command into a “catch all” command which makes it difficult to use for the user. Internally, it may increase coupling.
- Pros: Easy to implement as it requires just adding new prefixes to the existing
Summary
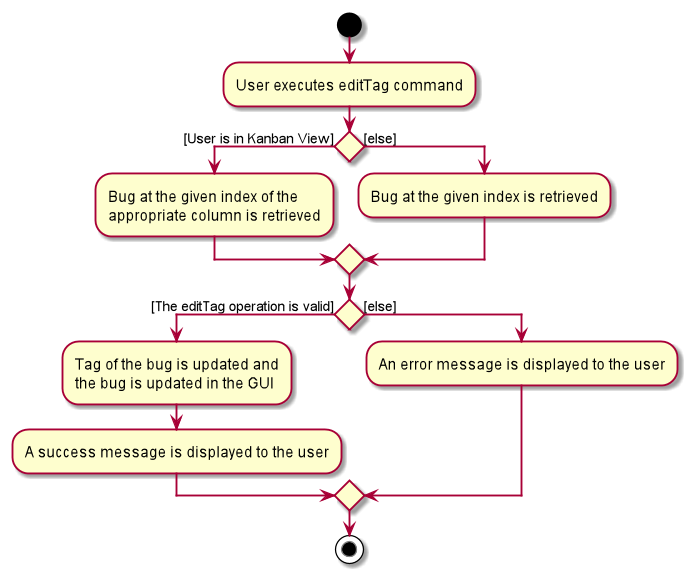
The following activity diagram summarizes what happens when a user executes a editTag INDEX (c/COLUMN) ot/OLD_TAG nt/NEW_TAG command with the correct format.
Add tag feature
This feature allows a user to add tags to a particular bug. Users will only need to specify the tags that they want to add, which saves them the hassle of having to delete all the tags of the bug and adding them again.
The user can make use of this feature by entering the addTag command, which follows the following format: addTag INDEX (c/COLUMN) nt/NEW_TAG.
To understand in greater depth the format of the command, you may refer to our User Guide
This section explains:
- How the
addTagcommand works and the methods that it invokes during execution (Implementation subsection). - The various considerations that were weighed when brainstorming the design of the add tag feature (Design Considerations subsection).
- A summary that shows a simplified Activity Diagram that captures the essential logic in the execution of the
addTagcommand (Summary subsection).
Implementation
The implementation of the add tag feature is greatly similar to that of the edit tag feature. The difference is that instead of EditTagCommand and EditTagByStateCommand objects, the add tag feature is facilitated by AddTagCommand and AddTagByStateCommand objects. As such, to understand the implementation of this feature, it is sufficient to read the introduction of the implementation of previous section.
Refer to the sequence diagram below to understand the top-level execution of the execute() method after the user enters a valid addTag command. While the execution is similar to that of the editTag command, it differs in some key areas which I will point out. For brevity and to reduce duplicate text, I will redirect you to the steps of the execution of the editTag command when necessary.
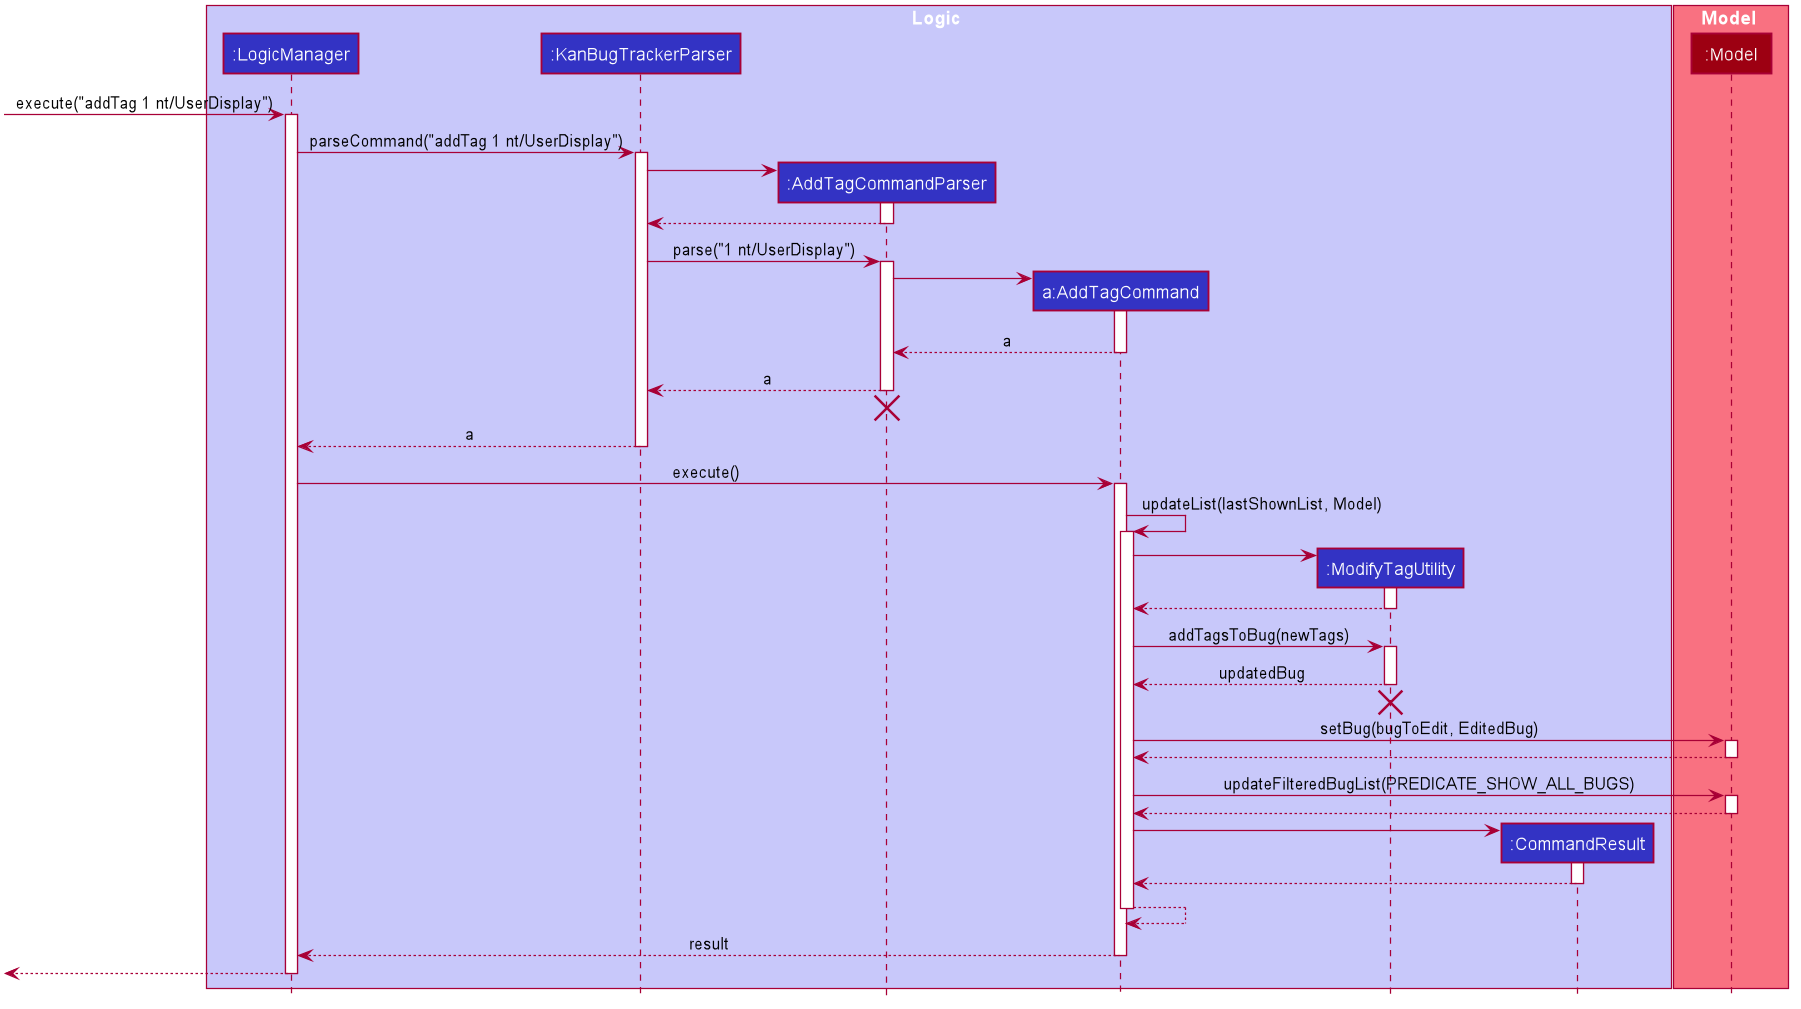
AddTagCommandParser object and ModifyTagUtility object should end at the destroy marker (X) but due to a limitation of PlantUML, the lifeline reaches the end of diagram.
From the above diagram, add a UserDisplay tag to the bug at index 1 in List View to involves the following steps:
Step 1: User inputs addTag 1 nt/UserDisplay to achieve the outcome as described above.
Steps 2 - 6 are similar to those of the editTag command. AddTag variants of objects are called instead of the EditTag variants used in the execution of the editTag Command.
Step 7: The AddTagCommand object calls the addTagsToBug(newTags) method of ModifyTagUtility to create an updated version of the target bug with the newly added tags.
Step 8 is the same as in the editTag command.
Design Considerations
The design considerations for this feature are the same as the design considerations for the edit tag feature. As such, you can refer to that section of the Developer Guide here.
Summary
The activity diagram that summarizes what happens when a user executes a addTag INDEX (c/COLUMN) nt/NEW_TAG command with the correct format is similar to that of the activity diagram for the edit tag feature which you can see here. Instead of executing an editTag command, the user would execute an addTag command in this case.
Bug priority feature
Feature description: Each bug will now have a priority level (low, medium, high) that will be shown on the GUI. Users
can add or edit a bug with the priority using the pr/ tag. The priority is optional, but each bug must have at most
one priority only.
Implementation
The followings are notable differences between Priority and other fields of Bug:
- The
VALIDATION_REGEXofPRIORITYwill be set such that its constructor can only accept the stringslow,medium,higher(case-insensitive) - Aside from the 3 possible states of
Priority(low,mediumorhigh), it will also have the state ` ` that represent when the bug have no priority indicated. This type ofPrioritywill be create using an overload version of the constructor that accept no argument:new Priority("low")will create a low priority, butnew Priority()will create an “empty” priority. - We will check if the
Priorityis “empty” before showing it on the UI.
Bug is mandatory and also avoid using null (which could cause NullPointerException and break the app) at the same time.
Here is a diagram showing how an AddCommandParser works with the priorities:
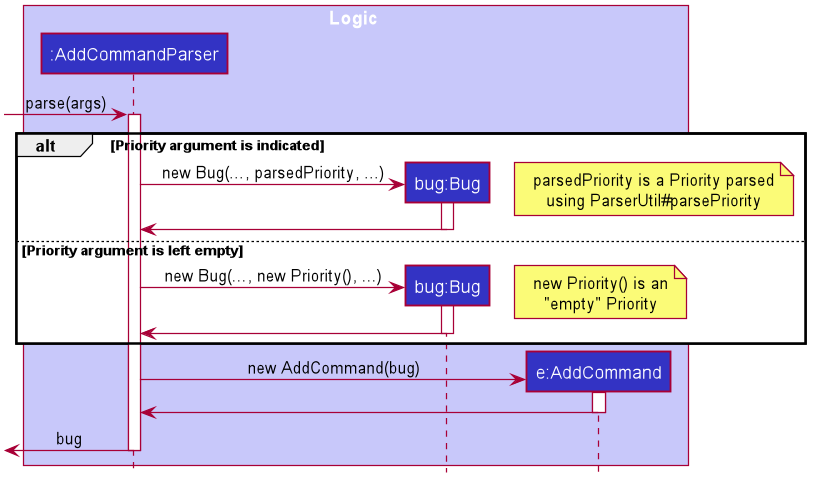
Given below is an example usage scenario concerning only the bug’s priority when the user add a new bug:
Step 1. The user launches the application for the first time. The KanBugTracker will be initialized with the initial KanBug Tracker state.
Step 2. The user execute the command “add n/Bug name d/Bug description pr/high”
Step 3. Through LogicManager and KanBugTrackerParser, an AddCommandParser will eventually have to parse "n/Bug name d/Bug description pr/high"
Step 4. The process will continue, after which an AddCommand object will be returned and executed as shown below:
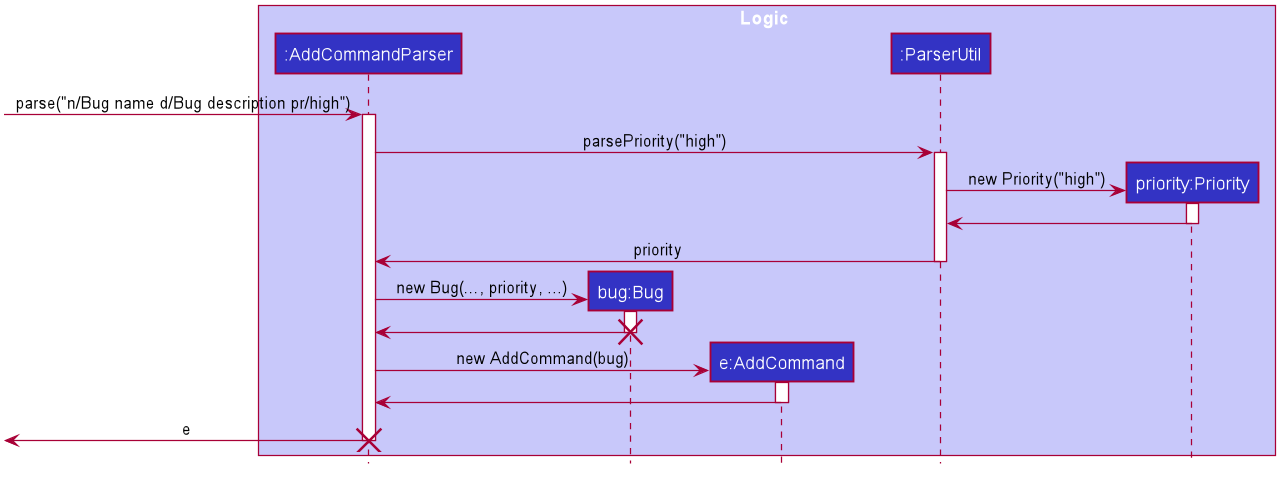
Design considerations
Regarding the Priority class:
-
Alternative 1 (current choice): Create
Priorityas a separate class- Pros: Adhere OOP principles
- Cons: Need to refactor quite a lot in many different places (because we need to change the signature of the
Bug’s constructor, which appear in many places.
-
Alternative 2: Create
Priorityas a subclass ofTag- Cons: Break the Liskov Substitution Principle (Since there can be multiple
Tags for eachBugbut there can only be onePriority).
- Cons: Break the Liskov Substitution Principle (Since there can be multiple
Regarding the situation when the bug’s priority is not indicated:
-
Alternative 1 (current choice): Create a special type called “empty” Priority
- Pros: Implementation will be similar to other existing fields.
- Cons: Need to make sure that this special type will not be shown to users.
-
Alternative 2: Use
Optional- Pros: Use imperative programming style, code look neater.
- Cons: Harder to implement correctly.
-
Alternative 3: Use
null- Pros: Easiest to implement.
- Cons: Risky because of possible
NullPointerException, also code will look complicated because of the need to check whether the object isnull.
Search feature
Implementation
The search command is facilitated by ModelManager. It generates a filtered list (updated by a specified Predicate<Bug> as an argument), stored internally as FilteredList<Bug>. It should have its own class named SearchCommand and inherits from the abstract class Command. The command then returns an instance of CommandResult upon success and prints feedback to the users.
Additionally, it implements the following operations:
-
SearchCommand#execute()- Executes thesearchcommand. -
ModelManager#updateFilteredBugList(Predicate<Bug>)- Filters internal data storage via its argumentPredicate<Bug>
The following class diagram shows the structure of the search command implementation:
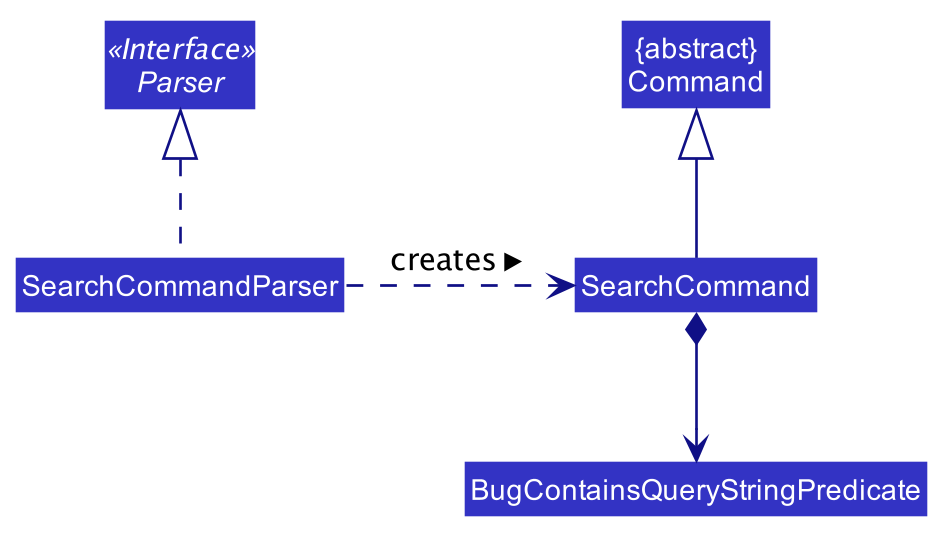
Given below is an example usage scenario and how the search feature behaves at each step:
Step 1. The user launches the application for the first time. The KanBugTracker will be initialized with the initial KanBug Tracker state.
Step 2. The user executes add n/Ui bug d/Displays wrongly the information s/todo t/Ui.java command to add a new bug to the KanBug tracker. A new bug with the following information is added:
- name: Ui bug
- description: Displays wrongly the information
- state: todo
- tag: Ui.java
Step 3. When there are a lot of bugs in the tracker, it is difficult for the user to look for a particular bug.
The user wants to see the information of the above bug. Then, the user executes search q/Ui bug.
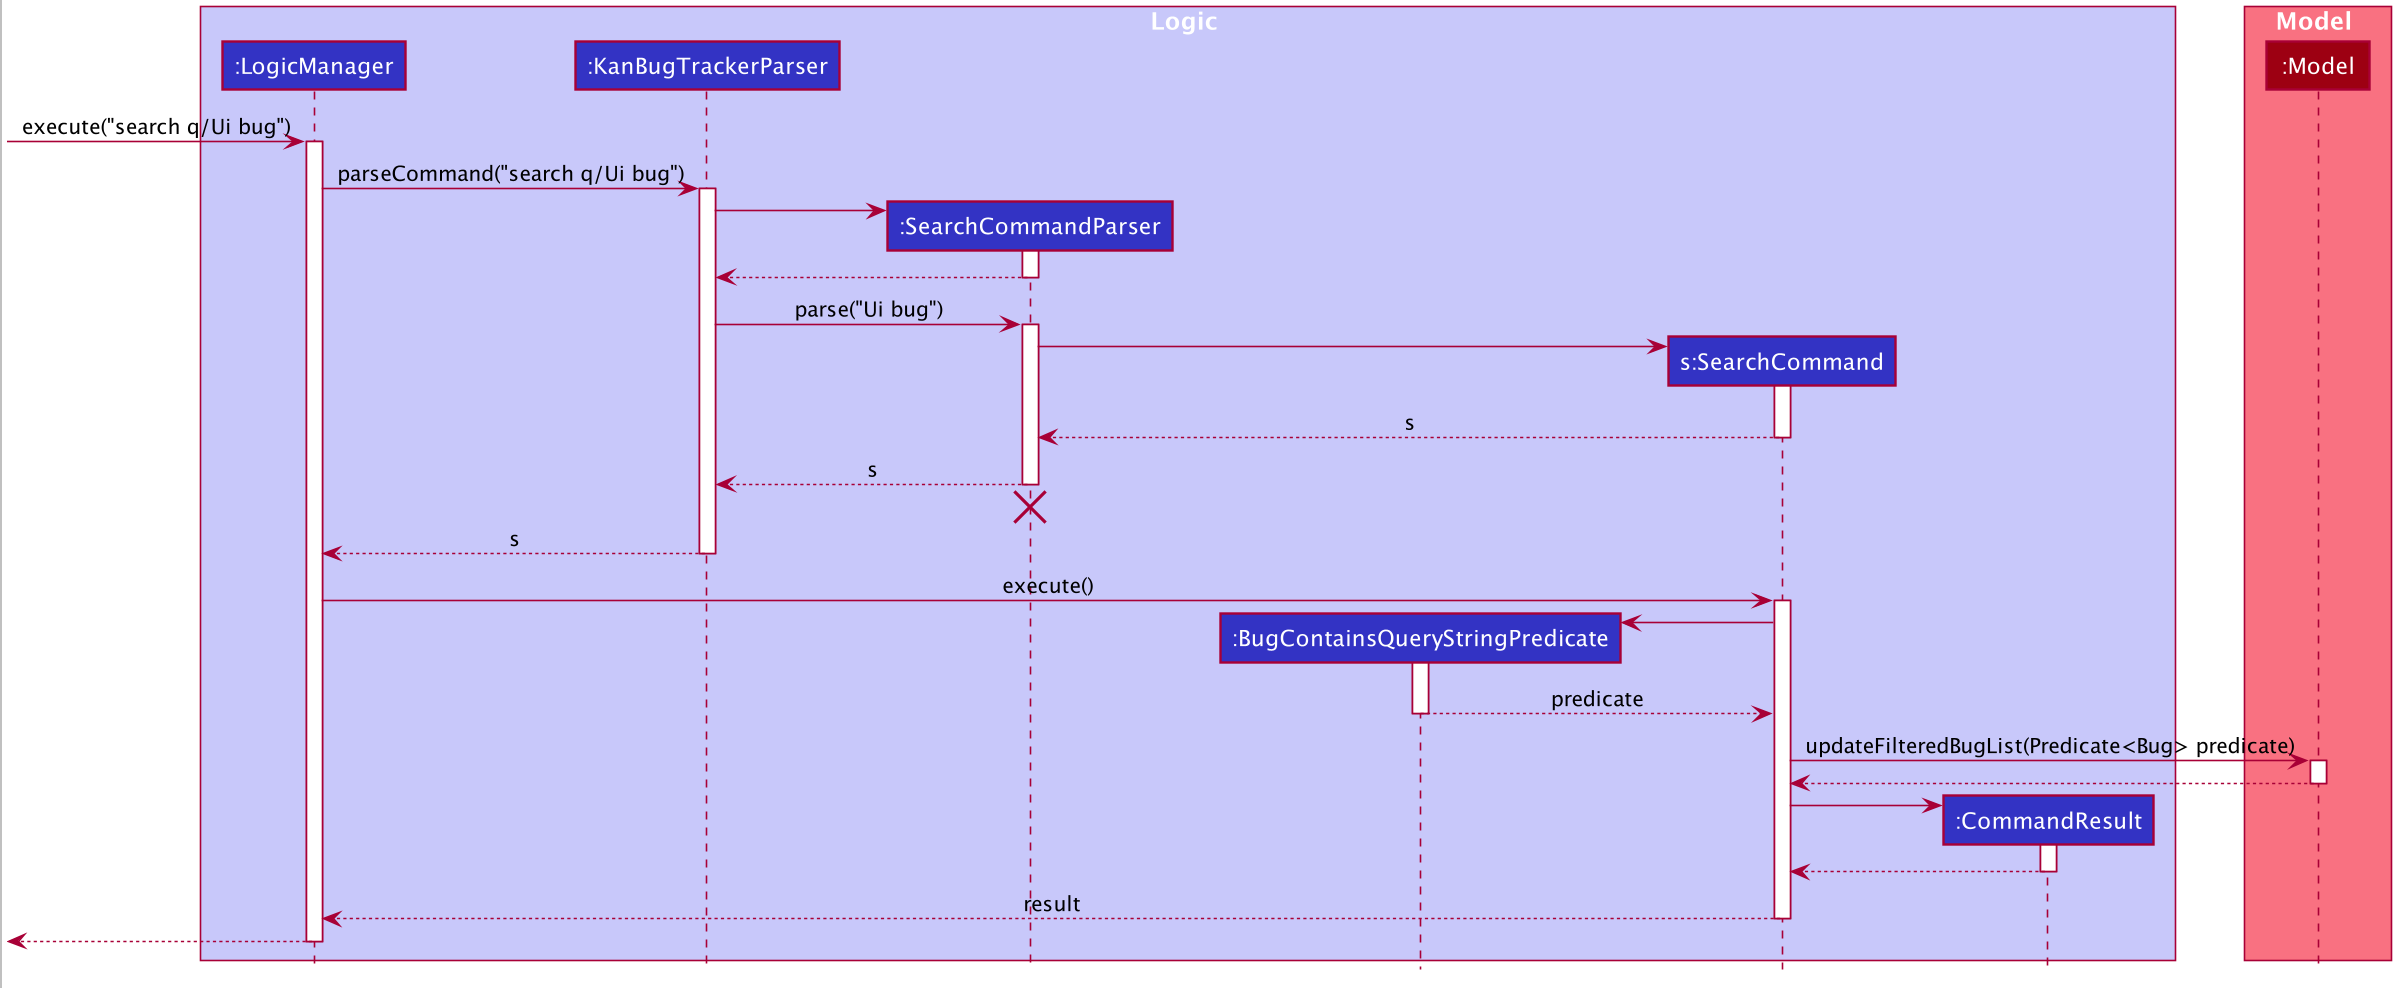
Step 4. This search command checks if the input is valid and then parses before using it to create a BugContainsQueryStringPredicate instance.
The predicate is internally passed and used to filter FilteredList.
This results in the information of all the bugs of which the name, description or tags contain Ui bug as a substring displays in the tracker.
The following sequence diagram summarizes what happens when a user executes the search command:
Design considerations
Alternative 1 (current choice): Use new prefix q/ to take query-string from the users.
- Pros: Easier for the users to search for the bug they want.
- Cons: Might have a lot of relevant bugs shown in the filtered list of records.
Alternative 2: Use current field prefixes such as n/, d/ or t/ to search.
- Pros: No need to create a new prefix.
- Cons: Difficult for the users to search for the bug they want.
Note feature
Implementation
The note feature is facilitated by Bug, AddCommandParser and EditCommandParser. It adds a new Note state that can be parsed by the AddCommandParser and EditCommandParser and stored internally as an Optional<Note> object inside Bug. This is done to give the user the option to remove the note section if they do not intend on using it.
The added operations by Note are internal operations that are handled by the AddCommandParser and EditCommandParser and as a result their functionality is not required elsewhere.
Given below is an example usage scenario and how the Note mechanism behaves at each step when used with AddCommandParser and EditCommandParser.
Step 1: The user launches the application and executes the add command and provides a Note input using the note/ prefix. The AddCommandParser then executes and splits the input String into its respective components according to the given prefix.
Step 2: The AddCommandParser then wraps the string following the note/ prefix in an Optional<Note> object which is then stored inside the new Bug that has been created.
The following activity diagram summarizes what happens when a user executes the add command:
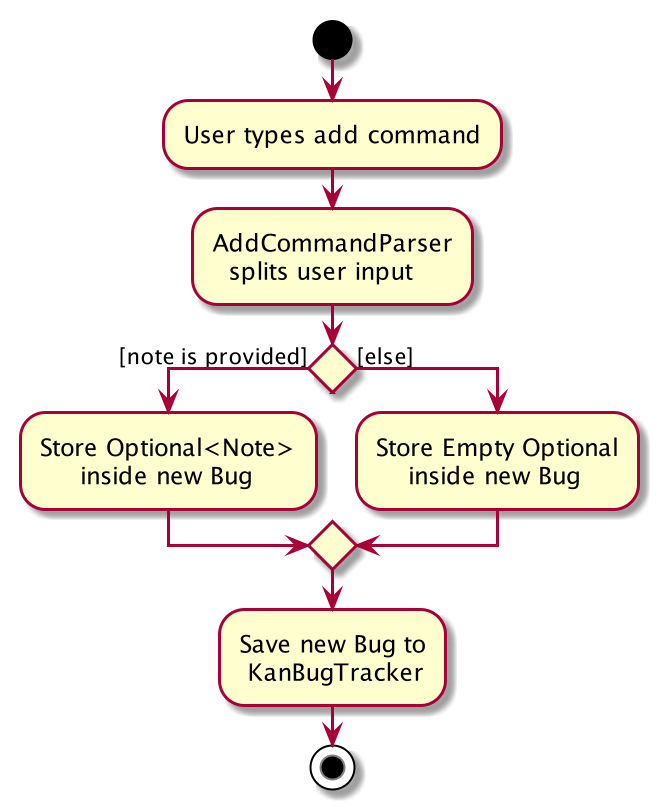
note/ command is not followed by a String, it will result in a message to the user that their input should not be blank.
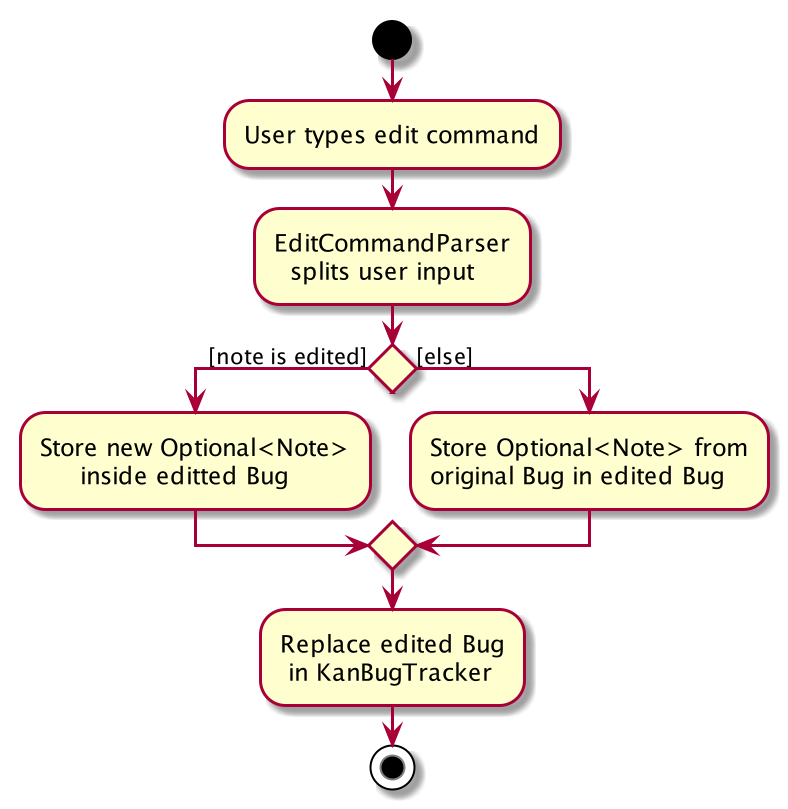
Step 3: The user then decides to change the Note in the bug that he has just added using the edit command accompanied with the note/ prefix. The EditCommandParser then executes and splits the input String into its respective components according to the given prefix.
Step 4: The EditCommandParser then copies the unchanged information from the original Bug into a new Bug while also modifying the Note state by wrapping the given input String into an Optional<Note> object and storing it in the new Bug that has been created. This new Bug object then replaces the original object in the KanBug Tracker.
The following activity diagram summarizes what happens when a user executes the edit command:
Design considerations
Aspect: How notes are stored and accessed
-
Alternative 1 (current choice): Saves the Note object as an Optional
object in Bug. - Pros: Prevents a null pointer exception and is a safer implementation while allowing the note field to be optional.
- Cons: Difficult to implement.
-
Alternative 2: Saves the Note object directly in Bug
- Pros: Easy to implement.
- Cons: Will run into null pointer exceptions that are hard to trace if the user chooses not to add a note.
Documentation, logging, testing, configuration, dev-ops
Appendix: Requirements
Product scope
Target user profile:
- Has a need to manage a significant number of bugs
- Prefers desktop apps over other types
- Prefers offline solutions
- Currently uses pen and paper to manage their bugs
- Can type fast
- Prefers typing to mouse interactions
- Is reasonably comfortable using CLI apps
Value proposition: Providing a lightweight yet powerful application that allows software engineering students to effectively manage and track the bugs they encounter faster than a typical mouse/GUI driven application. Students will interact with the application through a Command Line Interface. The application also presents itself as a portable offline solution.
User stories
Priorities: High (must have) - * * *, Medium (nice to have) - * *, Low (unlikely to have) - *
| Priority | As a … | I want to … | So that I can… |
|---|---|---|---|
* * * |
new user | see usage instructions | refer to instructions when I forget how to use the App |
* * * |
user | add a new bug | keep track of the bugs in my code |
* * * |
user | delete a bug | remove entries that I no longer need |
* * * |
user | add notes to specific bugs | quickly remember details about the bug |
* * * |
user | add tags to specific bugs | easily find related bugs |
* * * |
user | add a priority to specific bugs | see which bugs I need to fix first |
* * * |
user | see all the bugs | know what the bugs in my program are |
* * * |
user | search for bugs | find the bug(s) that I am looking for |
* * * |
user | change the state of a bug | track my bug fixing progress |
* * |
user | add deadlines to bugs | know which bugs I need to fix before the deadline |
* * |
experienced user | import and export my bugs | bring my bug tracking data over to a different computer |
* * |
experienced user | switch between different projects | track bugs for multiple projects simultaneously |
* * |
experienced user | link bugs together | understand interconnected problems in my code |
* |
experienced user | customise commands freely | change the name of the commands to make them easier to remember and use |
* |
experienced user | perform actions on multiple bugs | update multiple bugs at the same time |
* |
experienced user | generate bug reports | review the process I used to fix the bugs |
Use cases
(For all use cases below, the System is the KanBug Tracker and the Actor is the user, unless specified otherwise)
Use case: Delete a bug
MSS
- User requests to list bugs
- KanBug Tracker shows the list of bug
- User requests to delete a specific bug in the list
-
KanBug Tracker deletes the bug
Use case ends.
Extensions
-
2a. The list is empty.
Use case ends.
-
3a. The given index is invalid.
-
3a1. KanBug Tracker shows an error message.
Use case resumes at step 2.
-
Use case: Add a bug
MSS
- User requests to add bug
-
KanBug Tracker adds the new bug and displays the updated list of bugs to the user
Use case ends.
Extensions
-
1a. The bug format is invalid
-
1a1. KanBug Tracker shows an error message.
Use case resumes at step 1.
-
Use case: Edit a bug
MSS
- User requests to list bugs
- KanBug Tracker shows the list of bugs
- User requests to edit a specific bug in the list
-
KanBug Tracker edits the bug
Use case ends.
Extensions
-
2a. The list is empty.
Use case ends.
-
3a. The given index is invalid.
-
3a1. KanBug Tracker shows an error message.
Use case resumes at 2.
-
-
3b. The user enters an invalid edit format
-
3b1. KanBug Tracker shows an error message.
Use case resumes at 2.
-
Use case: Move a bug
MSS
- User requests to list bugs
- KanBug Tracker shows the list of bugs
- User requests to move a specific bug to another state
-
KanBug Tracker moves the bug
Use case ends.
Extensions
-
2a. The list is empty.
Use case ends.
-
3a. The given index is invalid.
-
3a1. KanBug Tracker shows an error message.
Use case resumes at 2.
-
-
3b. The user enters an invalid edit format.
-
3b1. KanBug Tracker shows an error message.
Use case resumes at 2.
-
Use case: Search a bug
MSS
- User requests to list bugs
- KanBug Tracker shows the list of bugs
- User requests to search a particular bug in the KanBug Tracker
-
KanBug Tracker displays the resulting list of bugs
Use case ends.
Extensions
-
2a. The list is empty.
Use case ends.
-
3a. The given query-string is empty.
-
3a1. KanBug Tracker shows an error message.
Use case resumes at 2.
-
-
3b. The user enters an invalid search command format.
-
3b1. KanBug Tracker shows an error message.
Use case resumes at 2.
-
Non-Functional Requirements
- KanBug Tracker should work on any mainstream OS as long as it has Java
11or above installed. - A user with above average typing speed for regular English text (i.e. not code, not system admin commands) should be able to accomplish most of the tasks faster using commands than using the mouse.
- KanBug Tracker should be able to hold up to 10000 bug items without a remarkable sluggishness in performance for typical usage.
- KanBug Tracker should work on both 32-bit and 64-bit environments.
- The size of the compiled JAR file (KanBugTracker.jar) should be less than 100Mb.
- KanBug Tracker should be intentionally designed for a single-user (i.e. KanBug Tracker should not be a multi-user application).
- KanBug Tracker should be developed incrementally over the project duration.
- The software’s codebase should adhere to OOP principles.
Glossary
- Mainstream OS: Windows, Linux, Unix, OS-X
- Command Line Interface (CLI): Text-based user interface that is used to view and manage device files.
- Graphical User Interface (GUI): A visual way of interacting with a device using a variety of items (e.g. windows, tables, icons, etc.).
- OOP: Object-Oriented Programming.
- Prefix: A set of characters placed before a specified parameter when typing a command.
- Query-string: The user keyword input (that can be one word or multiple words) to find matches when the search command is executed.
We also provide a glossary for non-technical terms of KanBug Tracker in Understanding KanBug Tracker section of the User Guide.
Appendix: Instructions for manual testing
Given below are instructions to test the app manually.
Launch and shutdown
-
Initial launch
-
Download the jar file and copy into an empty folder
-
Double-click the jar file Expected: Shows the GUI with a set of sample contacts. The window size may not be optimum.
-
-
Saving window preferences
-
Resize the window to an optimum size. Move the window to a different location. Close the window.
-
Re-launch the app by double-clicking the jar file.
Expected: The most recent window size and location is retained.
-
Switching views
-
Switching KanBug Tracker’s view with
switch. -
Prerequisites: None.
-
Test case:
-
Open the app
Expected: the default view should be Kanban View. -
Execute
switch
Expected: the view should be switched. -
Execute
switchagain
Expected: the view should be switched back to the original one.
-
Opening the help window
-
Opening the KanBug Tracker’s
helpwindow in two ways. -
Prerequisites: Launch KanBug Tracker successfully
-
Test case 1:
-
Switch to Kanban View.
-
Execute
help
Expected: thehelpwindow should be opened. -
Close the
helpwindow using the mouse
Expected: only thehelpwindow will be closed.
-
-
Test case 2:
-
Switch to List View.
-
Press
F1
Expected: thehelpwindow should have opened. -
Select the app’s main window (either using your mouse or by pressing
Alt+Tabon your keyboard). -
Press
F1again
Expected: thehelpwindow should be selected again. -
Press
Esc
Expected: only thehelpwindow will be closed.
-
Adding a bug
-
Adding a bug using the
addcommand. -
Prerequisites: Launch KanBug Tracker successfully and clear all the bugs.
-
Test case 1:
-
Switch to Kanban View.
-
Execute
add n/My bug d/Text
Expected: a new bug with the name “My bug” and description “Text” should be added in theBacklogcolumn. -
Execute
add n/Bug d/Des t/tag1 t/tag2 pr/low s/done
Expected: a new bug with the correct fields should be added in theDonecolumn.
-
-
Test case 2:
-
Execute
add n/bug d/des
Expected: a new bug with the correct fields should be added. -
Execute
add n/b
Expected: No bug is added. The app should response with “Invalid command format! …” (since thedescriptionfield is missing). -
Execute
add n/bug
Expected: No bug is added. The app should response with “This bug already exists in …” (since a bug with the same name already exists).
-
Searching bugs
-
Searching bugs using the
searchcommand. -
Prerequisite: The app has 3 bugs: a bug named “name1” with description “des1”, a bug named “me12” with description “description” and a bug named “bug12” with description “description”.
-
Test case:
-
Execute
search q/e1
Expected: the bug “name1” and the bug “me12” are listed. -
Execute “search q/w”
Expected: no bugs are listed. -
Execute “search q/description”
Expected: the bug “me12” and the bug “bug12” are listed.
-
Listing all bugs
-
Listing all bugs using the
listcommand. -
Prerequisite: Same prerequisite used above for Searching bugs.
-
Test case:
-
Execute
search q/e1, now 2 bugs should be listed. -
Execute
list
Expected: all 3 bugs are listed. -
Execute
listagain
Expected: all 3 bugs are still listed.
-
Deleting a bug
-
Deleting a bug while all bugs are being shown.
-
Prerequisites: List all bugs using the
listcommand. Multiple bugs in the list, at least one is intodo. -
Test case 1:
-
Switch to List view.
-
Execute
delete 1
Expected: First bug is deleted from the list. Details of the deleted bug shown in the status message. -
Execute
delete 0
Expected: No bug is deleted. The app should response with “Invalid command format…”. -
Execute
delete xwhere x is larger than the number of bug in the list
Expected: No bug is deleted. The app should response with “The bug index provided is invalid”. -
Execute
delete 1 c/backlog
Expected: No bug is deleted. The app should response with “Please do not provide column in List view window”
-
-
Test case 2:
-
Switch to Kanban view.
-
Add some bugs into the todo column.
-
Execute
delete 1 c/todo
Expected: First bug is deleted from theTodocolumn. Details of the deleted bug shown in the status message. -
Execute
delete 1
Expected: No bug is deleted. The app should response with “Please provide column in Kanban view window”.
-
Editing bugs
-
Editing a bug using the
editcommand. -
Prerequisite: There are multiple bugs, at least one is in
todo. -
Test case 1:
-
Switch to List view and ensure that there is at least one bug.
-
Execute
edit 1 t/tag1 pr/low note/some note
Expected: The first bug will have a new tag, priority and note according to the command. Details of the bug are shown in the status message. -
Execute
edit 1 pr/ note/ t/
Expected: The first bug will have its priority, note and tags removed. Details of the bug are shown in the status message. -
Execute
edit n/name c/todo
Expected: No bug is edited. The app should response with “Please do not provide column in List view window”.
-
-
Test case 2:
-
Switch to Kanban view and ensure that there is one bug with state of todo.
-
Execute
edit 1 d/desc
Expected: No bug is edited. The app response with “Please provide column in Kanban view window”. -
Execute
edit 1 c/todo d/desc
Expected: The first bug in theTodocolumn is edited. Details of the bug are shown in the status message.
-
Adding tags to an existing bug
-
Adding tags to a bug without removing the original ones.
-
Prerequisite: The first bug in the List view have at least one tag and at least one bug with state of
backlog. -
Test case 1:
-
Switch to List view and remove all the tags for index 1.
-
Execute
addTag 1 nt/tag3 nt/tag4
Expected: The first bug has two more tags along with the original ones. Details of the bug is shown in the status message. -
Execute
addTag 1 nt/tag4
Expected: No tags will be added. The app should response with “The new tag already exists”. -
Execute
addTag 1 nt/tag5 c/backlog
Expected: No tags will be added. The app should response with “Please do not provide column in List view window”.
-
-
Test case 2:
-
Switch to Kanban view.
-
Ensure that first bug in backlog as no tags.
-
Execute
addTag 1 nt/tag5 c/backlog
Expected: First bug in backlog will have an addition tag of “tag5” -
Execute
addTag 1 nt/tag5 c/backlogagain
Expected: No tags will be added. The app should response with “The new tag already exists”. -
Execute
addTag 1 nt/tag6
Expected: No tags will be added. The app should response with “Please provide column in Kanban view window”.
-
Editing a single tag of a bug
-
Editing a tag of some bug without removing the other ones.
-
Prerequisite: The first bug in the List view has two tags “tag1” and “tag2”.
-
Test case 1:
-
Switch to List view.
-
Execute
editTag 1 ot/tag1 nt/tag3
Expected: The tag “tag1” of the first bug is rename to “tag3”. -
Execute
editTag 1 ot/tag1 nt/tag4
Expected: No tags will be edited. The app should response with “A valid existing tag must be supplied.”. -
Execute
editTag 1 ot/tag2 nt/tag3
Expected: No tags will be edited. The app should response with “The new tag already exists!”. -
Execute
editTag 1 ot/tag2 nt/tag4 c/backlog
Expected: No tags will be edited. The app should response with “Please do not provide column in List view window”.
-
-
Test case 2:
-
Switch to Kanban view.
-
Ensure that first bug in backlog has has two tags “tag1”.
- Execute
editTag 1 ot/tag1 nt/tag2
Expected: No tags will be edited. The app should response with “Please provide column in Kanban view window”. - Execute
editTag 1 ot/tag1 nt/tag2 c/backlog
Expected: The tag “tag1” of the first bug in backlog is rename to “tag2”.
-
Moving a bug to a new state
-
Moving a bug to a new state using the
movecommand. -
Prerequisite: Successfully opened the app. Clear all bugs.
-
Test case 1:
-
Switch to List view.
-
Add a bug with state
backlog -
Execute
move 1 s/todo
Expected: The state of the first bug in the list is changed totodo. Details of the bug is shown in the status message. -
Execute
move 1 s/todoagain
Expected: No bug has its state edited. The app should response with “Cannot move bug to the same state…”.
-
-
Test case 2:
-
Switch to Kanban view.
-
Add a bug with state
backlog -
Execute
move 1 c/backlog s/todo
Expected: The state of the first bug in the list is changed totodo. Details of the bug is shown in the status message. -
Execute
move 1 c/backlog s/todoagain
Expected: No bug has its state edited. The app should response with “The bug index provided is invalid”.
-
Clearing all bugs
-
Clearing all current bugs in the list.
-
Prerequisite: The app have some bugs.
-
Test case:
-
Execute
clear
Expected: All bugs is cleared. -
Add some bugs to the app.
-
Execute
clear all
Expected: No bug is deleted. The app response with “Please remove extra irrelevant arguments!”.
-
Exiting KanBug Tracker
-
Exiting the app and closing the window.
-
Prerequisite: The app is successfully opened.
-
Test case 1:
- Execute
exit
Expected: The app’s window is closed.
- Execute
-
Test case 2:
- Press Esc
Expected: The app’s window is closed.
- Press Esc
-
Test case 3:
-
Open
helpwindow. -
Focus on the main window.
-
Press Esc
Expected: Both the app’s window and thehelpwindow is closed at once.
-
Saving data
-
Dealing with missing/corrupted data files.
-
Prerequisite: The app have some bugs.
-
Test case 1:
-
Close the app.
-
Edit the
KanBugtracker.jsonfile by editing the description field of some bug into “bug description”. -
Open the app again
Expected: The change should be reflected in the app.
-
-
Test case 2:
-
Close the app.
-
Edit the
KanBugtracker.jsonfile by editing the name field of some bug into “@”. -
Open the app again
Expected: The app now will have no bugs on it (since “@” is not a valid name for the bugs).
-